- October 15, 2024
- in HVAC
- by Kyle Stewart
Keeping your home’s HVAC system in top shape is crucial, and duct boot maintenance plays a significant role in this. These unsung heroes of your heating, ventilation, and air conditioning system ensure that air flows efficiently from the ducts to your living spaces. Regular checks for wear and tear, sealing leaks, and cleaning out dust can vastly improve your HVAC’s performance, not to mention help you save on energy costs.
Plus, it’s a big win for indoor air quality. Whether you’re a seasoned homeowner or managing a building, understanding the ins and outs of duct boot maintenance can make a huge difference in your system’s efficiency and longevity. Let’s dive into why keeping those duct boots in check is essential and how you can maintain them for optimal performance.
What is Duct Boot Maintenance?
Duct boot maintenance is an essential aspect of ensuring the efficiency and longevity of a building’s heating, ventilation, and air conditioning (HVAC) system. The duct boot, a critical component of the ductwork, serves as the transition piece connecting the ducts to the air vents. Proper maintenance involves regular inspections for signs of wear and tear, sealing leaks to prevent air loss, and cleaning to remove dust and debris.
This process not only enhances the performance of the HVAC system, reducing energy consumption and costs but also improves indoor air quality, making it a fundamental practice for homeowners and building managers. By prioritizing duct boot maintenance, individuals can significantly contribute to the overall health and efficiency of their HVAC systems, ensuring a comfortable and safe environment.
Why is Duct Boot Maintenance Crucial?
Duct boot maintenance is crucial for several key reasons. Firstly, it prevents costly energy losses, ensuring that air precisely flows where it’s needed, thereby making the HVAC system work more efficiently and reducing utility bills. Secondly, it significantly enhances overall system performance by maintaining optimal airflow, which directly contributes to a more comfortable living or working environment.
Lastly, adhering to a regular maintenance schedule prolongs the operational life of the HVAC system by preventing premature wear and tear on its components. For homeowners and facility managers in North Florida, where the climate can place extra demands on HVAC systems, maintaining the integrity of duct boots is particularly important. This practice is essential to withstand seasonal peaks in heating and cooling needs, ensuring energy efficiency and system reliability.
Prevents Costly Energy Losses
Regular maintenance of duct boots helps in sealing leaks and preventing air from escaping. This efficiency ensures that the HVAC system operates smoothly, leading to significant savings on energy bills.
Enhances Overall System Performance
Maintaining duct boots optimizes airflow, resulting in a more efficient HVAC system. This optimization provides consistent temperatures and enhanced comfort, making every room in your home or facility feel just right.
Prolongs HVAC System’s Operational Life
Proper care and maintenance of duct boots reduce the strain on the HVAC system by preventing unnecessary wear and tear. This care extends the lifespan of the system, offering long-term savings on potential early replacement costs.
Optimal Timing for Maintenance
The best time for duct boot maintenance is before seasonal HVAC demand peaks, particularly in the transition to summer or winter when HVAC systems are put under considerable stress. Additionally, maintenance should be considered upon detecting performance issues, such as uneven heating or cooling, to prevent further system strain. Timely maintenance ensures your HVAC system remains efficient and reliable, ready to handle the seasonal demands of North Florida’s climate.
| Season | Optimal Maintenance Timing | Reasons |
| Summer | April – May | Prepare for the high demand of air conditioning during the peak of summer heat. |
| Winter | October – November | Ensure heating systems are efficient before the cold snap in winter. |
| Spring | February – March | Address any issues from the winter and prepare for the milder spring season. |
| Fall | August – September | Check the system after summer and prepare for the heating demands of fall and early winter. |
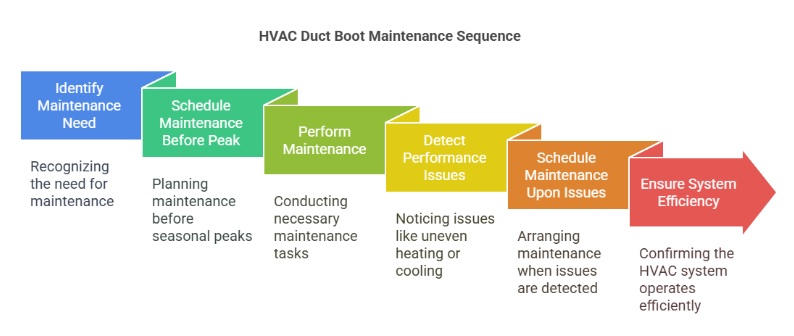
Before Seasonal HVAC Demand Peaks
Schedule duct boot maintenance well before the onset of extreme weather conditions—be it the summer heat or the winter cold. This preparation ensures your HVAC system is primed to handle the increased demand efficiently, keeping your environment comfortable without overstraining the system.
| Climate Zone | Maintenance Timing | Specific Considerations |
| Hot Climates | March – April | Prepare for extended use of air conditioning. |
| Cold Climates | September – October | Ensure heating systems can handle the cold. |
| Temperate | May and October | General check-ups for mild weather efficiency. |
Upon Detecting Performance Issues
Act promptly upon noticing any signs of HVAC inefficiency, such as uneven cooling or heating across different areas. Early maintenance can prevent the escalation of these issues, maintaining the optimal performance of your HVAC system and avoiding costly repairs.
| Performance Issue | Immediate Action | Expected Benefit |
| Uneven Heating/Cooling | Schedule inspection | Prevent further system strain |
| Increased Energy Bills | Check for leaks/sealant needs | Reduce unnecessary energy consumption |
| Strange Noises | Inspect for physical damage | Avoid major repairs by addressing early |
Timely maintenance, guided by the specifics of the climate and the signs of wear or inefficiency, ensures your HVAC system remains efficient and reliable, ready to handle the seasonal demands and unexpected issues with minimal disruption.
Inspecting Duct Boots for Integrity
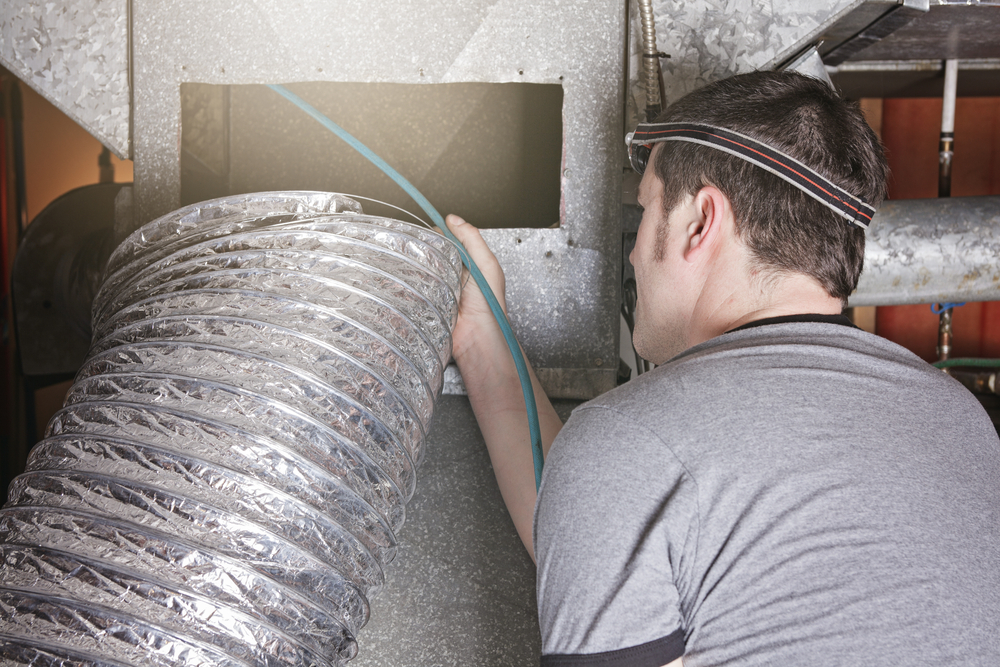
Inspecting duct boots for integrity is a critical step in maintaining an HVAC system’s efficiency. This process involves a detailed examination to identify physical deterioration, such as cracks or signs of rust, which can significantly compromise the system’s performance. It’s equally important to assess for dislodged or loose connections that could lead to costly air leaks.
For a more accurate diagnosis, utilizing smoke pencils for leak detection can visually reveal even the smallest breaches in the system. Regular inspections ensure that the ductwork remains in optimal condition, thereby contributing to the overall performance and longevity of the HVAC system.
Identify Physical Deterioration
Check for signs of wear and tear on duct boots, such as:
- Cracks or holes that may have formed over time.
- Rust on metal parts, indicating moisture issues or age.
- Brittle or discolored areas on flexible duct boots, suggesting degradation.
These physical signs of deterioration can significantly undermine the system’s efficiency, leading to increased energy consumption and costs.
Assess for Dislodged or Loose Connections
Inspect duct boots carefully for any dislodged or loose connections. Common areas to check include:
- Where the duct boot connects to the ductwork itself.
- The perimeter of the boot where it meets floor, wall, or ceiling registers.
Ensuring a secure and tight fit is crucial for maintaining optimal airflow, preventing leaks, and ensuring the HVAC system operates at peak performance.
Utilize Smoke Pencils for Leak Detection
Employ smoke pencils as a method to visually detect leaks around duct boots. Steps to effectively use smoke pencils include:
- Activate the smoke pencil near the suspected leak area.
- Observe the smoke’s movement; smoke being drawn into cracks or gaps indicates a leak.
- Mark these areas for sealing or further inspection.
This technique allows for the precise identification of even minor leaks, facilitating targeted repairs to maintain system integrity and efficiency.
Cleaning Procedures for Duct Boots
Effective cleaning of duct boots is crucial for maintaining the efficiency of the HVAC system and ensuring a healthy indoor environment. This involves removing accumulated dust and debris which, if left unchecked, can restrict airflow and degrade air quality. Employing gentle vacuuming techniques is essential to extract dirt without causing any damage to the ductwork.
For the vacuuming process, using a soft brush attachment is recommended to gently remove dust without harming the duct surfaces. This attachment is particularly effective in dislodging dust particles while preventing scratches or dents on the duct boots. Cleaning frequency should be adjusted based on the environment and usage.
In general, duct boots should be cleaned at least once every season to coincide with HVAC maintenance schedules. However, in areas prone to high dust levels or in homes with pets, more frequent cleaning may be necessary to maintain optimal air quality and system performance. Regular and careful cleaning not only enhances the operational performance of the HVAC system but also significantly reduces the circulation of allergens and pollutants, contributing to a cleaner, healthier living or working space.
Remove Accumulated Dust and Debris
Regularly removing dust and debris from duct boots is critical for preventing blockages and maintaining optimal airflow. This straightforward but vital step ensures your HVAC system functions efficiently, contributing to better indoor air quality.
Employ Gentle Vacuuming Techniques
Gentle vacuuming techniques are essential for cleaning duct boots without damaging them. This careful approach effectively eliminates dirt and dust, preserving the integrity of the ductwork and enhancing the overall performance of the HVAC system.
Effective Sealing of Duct Boot Leaks
Effectively sealing duct boot leaks is pivotal for maintaining the efficiency and integrity of the HVAC system. Choosing the appropriate sealant materials is crucial, with options like mastic sealant for durable coverage and metallic foil tape for quick fixes. The precise application of sealants ensures that all potential leak points are thoroughly covered, preventing air loss and energy waste.
This crucial step not only optimizes the system’s performance but also contributes to a more consistent and comfortable indoor climate, underscoring the importance of addressing leaks promptly and effectively.
Selecting Appropriate Sealant Materials
Choosing the right sealant materials is essential for effectively sealing duct boot leaks.
| Sealant Type | Use Case | Advantages | Application Tips |
| Mastic Sealant | Larger leaks, areas needing robust seal | Durable, long-lasting coverage; flexible, adheres well to uneven surfaces | Apply with a brush or gloved hand, ensure even coverage, allow to dry fully |
| Metallic Foil Tape | Smaller leaks, hard-to-reach areas | Quick and easy to apply; provides immediate seal | Clean and dry surface before application, press firmly for secure adhesion |
Precise Sealant Application Methods
The correct application of sealant is critical to the repair’s success.
Ensure Clean, Dry Surfaces Before Application
Ensure that the surface is clean and dry before applying any sealant. This step is crucial for preventing adhesion issues and securing a stronger, more effective seal.
Apply Evenly, Covering All Potential Leak Points
Apply the sealant evenly, making sure to cover all potential leak points thoroughly. This careful and meticulous application helps prevent future leaks, enhancing the HVAC system’s efficiency and performance.
Steps for Replacing a Damaged Duct Boot
Replacing a damaged duct boot involves a series of precise steps to ensure a seamless and effective restoration of the HVAC system’s integrity. Initially, accurate measurement of the existing boot is essential to select the right replacement that matches the material and size specifications. Choosing the correct replacement ensures compatibility with the existing system, preventing future issues.
The next critical step is the secure installation of the new duct boot, which involves ensuring a tight fit and proper sealing to eliminate any potential for leaks. This meticulous process not only restores the functionality of the HVAC system but also enhances its efficiency and performance, ensuring a comfortable indoor environment.
| Step | Detail | Tips |
| 1. Accurate Measurement of the Existing Boot | Measure the dimensions (diameter, length) of the existing duct boot. | Use a tape measure for accuracy. Note any unique shapes or configurations. |
| 2. Choosing the Right Replacement | Select a duct boot that matches the material (e.g., metal, flexible duct) and size specifications of the original. | Consider the airflow requirements and compatibility with existing ductwork. |
| 3. Removal of the Old Duct Boot | Carefully disconnect and remove the damaged duct boot. | Use appropriate tools (screwdriver, utility knife) to avoid damaging surrounding ductwork. |
| 4. Preparation for New Installation | Clean the area around the ductwork where the new boot will be installed. | Ensure the surface is free of dust and debris for a better seal. |
| 5. Secure Installation Techniques | Install the new duct boot, ensuring a tight fit and proper alignment with the ductwork. | Use screws or clamps for secure attachment. Double-check alignment before finalizing. |
| 6. Sealing the Duct Boot | Apply mastic sealant or metallic foil tape around the connections to prevent leaks. | Ensure clean, dry surfaces for optimal adhesion. Cover all potential leak points evenly. |
| 7. Testing for Leaks | Use a smoke pencil or similar device to check for air leaks around the newly installed duct boot. | Address any leaks immediately with additional sealant or adjustments to the installation. |
Preventative Strategies for Duct Maintenance
Adopting preventative strategies for duct maintenance is essential for ensuring the long-term efficiency and reliability of HVAC systems. Regular filter replacement is a key practice that keeps the system clean, reducing strain on its components and improving air quality. Additionally, insulation checks around ductwork are vital for maintaining optimal temperature control and preventing energy loss.
Lastly, annual professional HVAC inspections play a crucial role in identifying and addressing minor issues before they escalate, saving time and money in the long run. These proactive measures not only extend the lifespan of the HVAC system but also contribute to a more comfortable, healthy, and energy-efficient environment.
| Strategy | Details | Frequency | Benefits |
| Regular Filter Replacement Schedule | Use filters with an appropriate MERV rating (Minimum Efficiency Reporting Value) to balance airflow and filtration efficiency. MERV ratings between 7 and 13 are generally recommended for residential systems. | Every 1-3 months, depending on filter type and indoor air quality. | Ensures cleaner airflow, reduces system strain, prolongs operational life, and improves indoor air quality. |
| Insulation Checks Around Ductwork | Visually inspect and touch the insulation for signs of wear such as tears, dampness, or areas where the insulation has compressed or shifted. | Annually, and before the onset of extreme seasonal temperatures. | Prevents energy loss, maintains consistent temperatures, reduces energy expenses, and enhances system efficiency. |
| Professional HVAC Inspections Annually | An HVAC professional should inspect the system for any mechanical issues, ductwork integrity, refrigerant levels, and overall system performance. | Annually, ideally before the heating or cooling season. | Identifies and rectifies minor issues before they escalate, ensures the system is operating efficiently, and can prevent costly repairs. |


