- December 18, 2024
- in HVAC
- by Ross Taylor
Step-by-step installation guide
To ensure a successful duct boot installation, follow this detailed guide. Each step includes recommended materials and tools, along with estimated time frames to help you plan the task effectively.
Secure the duct boot to the floor or wall
Use screws or nails for attachment
- Surface Type: Drywall, Concrete, Wood
- Recommended Screws/Nails:
- Drywall: 1 ½ inch drywall screws
- Concrete: 2 inch concrete nails or screws with anchors
- Wood: 1 ½ inch wood screws
- Tools Needed: Drill or hammer
- Estimated Time: 5 minutes
Seal the duct boot with foil tape or mastic
Ensure all edges are covered
- Materials: Foil tape or mastic
- Application Tips:
- Foil Tape: Apply in strips, ensuring each piece overlaps the previous one by at least 1 inch.
- Mastic: Use a brush or gloved hand to apply a uniform layer, covering all seams and joints.
- Common Mistakes: Not covering all edges, leaving gaps
- Estimated Time: 10 minutes
Attach the ductwork to the duct boot
Use screws for a firm connection
- Screw Type: 1 inch HVAC screws
- Tools Needed: Drill with screwdriver bit
- Alignment Tips: Ensure the ductwork aligns straight with the duct boot for a seamless connection. Use a level if necessary.
- Estimated Time: 5-10 minutes
Seal all connections with sealant
Apply sealant around all edges
- Sealant Type: HVAC-approved silicone sealant
- Application Tips: Cut the tip of the sealant tube at a 45-degree angle. Apply in a continuous bead around all connections. Smooth the sealant with a finger (wearing a glove) or a sealant tool.
- Drying Time: 24 hours for full cure
- Estimated Time (Application): 10 minutes
What is a duct boot?
A duct boot, integral to HVAC systems, serves as a critical connector between the ductwork and the room’s air vents. It is designed to facilitate a smooth transition of air flow from the main ducts to the specific outlets, ensuring efficient heating, cooling, and ventilation throughout the space. Typically made from metal or plastic, duct boots can be found in various shapes and sizes to match different types of flooring, walls, or ceilings they are installed in.
Their primary goal is to enhance the performance of HVAC systems by minimizing air leakage, thereby promoting energy efficiency and comfort in residential or commercial buildings. Understanding the function and importance of duct boots is essential for ensuring a well-maintained and optimally functioning HVAC system. To further reinforce the relevance of this section, here are examples of different types of duct boots and their specific applications in various HVAC setups:
- Straight Boot: Used in straightforward, direct connections between ductwork and floor registers. Ideal for installations where the duct runs directly to the vent.
- Angled Boot: Designed for situations where the ductwork approaches the vent at an angle, requiring a directional change to properly align with the vent.
- End Boot: Suitable for installations at the end of a duct run, facilitating a transition to a vent in a wall or ceiling.
- Transition Boot: Used to connect ducts of different sizes or to change the shape of the duct opening to match the vent.
Each type serves a unique purpose, ensuring that regardless of the layout or design of the HVAC system, there is a duct boot suited to provide an efficient and effective air flow transition.
Why is securing duct boots important?
Securing duct boots is crucial for several reasons. Firstly, it prevents air leaks, which are a common issue that can lead to energy waste and increased utility bills. Studies have shown that unsecured duct boots can contribute to a significant percentage of a home’s overall energy loss.
By ensuring a tight seal around duct boots, homeowners can enhance their energy efficiency, making their HVAC system work less to maintain comfortable temperatures. Additionally, a well-sealed duct boot contributes to improved indoor air quality by preventing dust, pollen, and other pollutants from entering the air stream. This is especially important for individuals with allergies or respiratory issues.
For example, sealing duct boots can reduce the infiltration of outdoor allergens like pollen by a noticeable percentage, thereby enhancing the indoor air quality. In essence, proper installation and maintenance of duct boots play a vital role in the overall performance of HVAC systems, directly impacting comfort, health, and financial well-being.
Prevents air leaks
Securing duct boots tightly prevents air leaks, a major cause of energy loss in homes. Air leaks around duct boots can lead to an increase in energy usage by up to 20-30%, significantly impacting the efficiency of HVAC systems and forcing them to work harder and use more energy to maintain desired temperatures.
Enhances energy efficiency
By preventing air leaks, securing duct boots directly enhances energy efficiency. This results in lower utility bills and a reduced carbon footprint, making it an environmentally friendly practice as well as a financially smart one. Homeowners can see a reduction in their energy bills by 10-15% after ensuring their duct boots are properly sealed and secured.
Improves indoor air quality
A well-sealed duct boot helps improve indoor air quality by preventing the infiltration of outdoor pollutants, dust, and allergens into the duct system and, consequently, into the living spaces. This is particularly beneficial for individuals with allergies or respiratory conditions, contributing to a healthier indoor environment. Studies have indicated that properly sealed HVAC systems can reduce indoor pollutant levels by a significant margin, thereby enhancing the quality of air within the home.
What materials are needed?
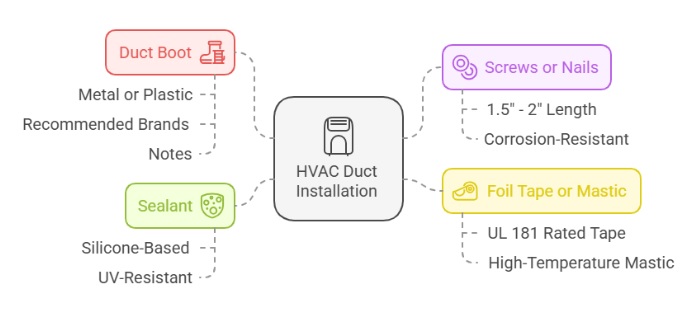
For a successful duct boot installation, you’ll need a duct boot that fits the size of your duct opening. To secure it in place, screws or nails are essential. For sealing, foil tape or mastic is recommended to ensure an airtight connection.
Lastly, a sealant is required to seal all connections and prevent any air leaks, enhancing the overall efficiency and air quality of your HVAC system. These materials are crucial for a secure and efficient installation, directly impacting the performance and longevity of your ductwork.
| Material | Type/Specification | Recommended Brands | Notes |
| Duct Boot | Metal or Plastic | HVACParts, AirFlowMax | Choose based on duct opening size and location (floor, wall, ceiling) |
| Screws or Nails | 1.5″ – 2″ length for screws, 1.5″ for nails | GripRite, BuildStrong | Use corrosion-resistant for damp areas |
| Foil Tape or Mastic | UL 181 rated tape, High-temperature mastic | SealTight Tape, MastiFlex | Tape for quick jobs, mastic for longer-lasting seal |
| Sealant | Silicone-based, UV-resistant | SealPro, DuraBond | Ensure it’s compatible with duct material and indoor air quality standards |
Preparing for installation
Before beginning the installation of a duct boot, it’s crucial to measure the duct opening accurately to ensure you select the right size duct boot. This step prevents potential issues with fit and air leaks. Next, choose the right size duct boot based on your measurements, considering the type of surface it will be attached to.
Finally, gather all necessary tools and materials needed for the installation, including screws or nails, foil tape or mastic, sealant, and the duct boot itself. Proper preparation streamlines the installation process, ensuring a secure fit and optimal performance of your HVAC system.
| Task | Tool/Material | Details | Notes |
| Measure the duct opening | Tape Measure | Use to get accurate dimensions of the duct opening. | Ensure measurements are taken from inside edges for precision. |
| Choose the right size duct boot | Duct Boot | Select based on the measurements taken. | Consider the type of surface (floor, wall, ceiling) it will be attached to. |
| Secure the duct boot | Screws or Nails | Use to firmly attach the duct boot to the surface. | Length and type depend on the surface material. |
| Seal the duct boot | Foil Tape or Mastic | Apply around the edges of the duct boot for an airtight seal. | Foil tape is easier to use but mastic provides a more durable seal. |
| Additional sealing | Sealant | Use around all connections to prevent air leaks. | Choose a high-quality, UV-resistant sealant for durability. |
| Gather tools | Screwdriver, Utility Knife | Screwdriver for screws, utility knife for cutting tape or trimming. | Ensure screwdriver matches the type of screws used. |
Measure the duct opening
Accurately measure the duct opening to ensure the duct boot fits perfectly, preventing any air leakage and ensuring efficient airflow.
Choose the right size duct boot
Selecting the right size duct boot is crucial based on the measurements taken. A correctly sized duct boot ensures a snug fit and optimal functionality of your HVAC system.
Gather necessary tools and materials
Before starting the installation, gather all necessary tools and materials. This includes screws or nails for securing the duct boot, foil tape or mastic for sealing, sealant for additional protection against leaks, and the duct boot itself. Having everything on hand streamlines the installation process.
Step-by-step installation guide
To install a duct boot effectively, start by securing the duct boot to the floor or wall using screws or nails, ensuring it’s firmly attached and in the correct position. Next, seal the duct boot with foil tape or mastic, covering all edges meticulously to prevent any air leaks. Following this, attach the ductwork to the duct boot, using screws for a firm, secure connection that won’t easily come loose.
Finally, seal all connections with sealant, applying it around all edges to enhance the seal and further prevent leaks. This step-by-step guide ensures a secure and efficient installation, contributing to the overall performance and energy efficiency of your HVAC system.
Secure the duct boot to the floor or wall
Use screws or nails for attachment
Ensure the duct boot is firmly attached to either the floor or wall, using screws or nails. This step is critical for creating a stable base for the ductwork and ensuring the integrity of the installation.
Seal the duct boot with foil tape or mastic
Ensure all edges are covered
To create an airtight seal, apply foil tape or mastic around the edges of the duct boot. It’s essential to cover every edge meticulously, preventing any potential air leaks that could compromise the system’s efficiency.
Attach the ductwork to the duct boot
Use screws for a firm connection
Securely connect the ductwork to the duct boot using screws. This ensures a durable connection that will withstand the test of time, maintaining the system’s integrity and performance.
Seal all connections with sealant
Apply sealant around all edges
As a final step, apply sealant around all connections, including the junctions where the duct boot meets the floor or wall and where the ductwork attaches to the boot. This additional layer of protection enhances the airtight seal, optimizing the HVAC system’s efficiency and performance.
Tips for effective securing
For an effective duct boot installation, it’s essential to regularly check for leaks. Use smoke or your hand to detect any drafts that indicate air leaks. Always use high-quality materials; opting for UV-resistant sealant and durable tape can significantly enhance the longevity and efficiency of the installation.
Additionally, ensure proper insulation around the duct boot by wrapping it with insulation tape or batting, which helps maintain temperature control and efficiency. Following these tips can lead to a more secure, efficient, and durable duct system, ultimately improving the performance of your HVAC system and contributing to a more comfortable indoor environment.
| Tip | Method | Material | Expected Outcome |
| Check for leaks regularly | Use smoke or a hand to feel for drafts around the duct boot. | Smoke machine or your hand. | Early detection of leaks, preventing energy loss and ensuring system efficiency. |
| Use high-quality materials | Opt for materials that offer durability and resistance to environmental factors. | UV-resistant sealant, high-quality foil tape or mastic. | A longer-lasting seal that maintains system integrity and efficiency over time. |
| Ensure proper insulation | Wrap the duct boot with insulation to prevent heat loss and maintain airflow efficiency. | Insulation tape or batting. | Improved temperature control and system efficiency, reducing the workload on your HVAC system and potentially lowering energy costs. |
Common installation mistakes
Avoiding common installation mistakes can significantly enhance the performance and longevity of your HVAC system. One frequent error is using the wrong size duct boot, which can lead to inefficient air flow and leaks. Another oversight is inadequate sealing, where not all connections are properly sealed, resulting in energy loss and reduced system efficiency.
Additionally, forgetting to check for leaks after installation is a critical step that’s often overlooked but essential for ensuring the system is airtight. Being aware of these common pitfalls and taking steps to avoid them can lead to a more efficient, effective, and durable HVAC system installation.
| Common Mistake | Correct Approach | Consequences of Mistake | How to Fix |
| Using the wrong size duct boot | Measure the duct opening carefully before purchasing a duct boot | Inefficient airflow and potential for air leaks, leading to energy loss | Measure twice, buy once. If the wrong size is purchased, exchange it for the correct size before installation |
| Inadequate sealing | Ensure all connections are properly sealed with foil tape or mastic | Reduced system efficiency due to energy loss from air leaks | Double-check all sealed areas. If leaks are found, apply additional sealant or tape to ensure airtightness |
| Forgetting to check for leaks after installation | Perform a thorough leak test using smoke or a hand to feel for drafts | Unidentified leaks can compromise system efficiency and increase energy costs | Conduct a leak test after installation and regularly thereafter. If leaks are detected, apply sealant or tape to seal |
Incorporating photos or diagrams of correctly vs. incorrectly installed duct boots could visually illustrate these common mistakes, making the guidance more practical and understandable.


